
In this tutorial, we will deploy a production ready app to the cloud using AWS ECS
This is the part 1 of the tutorial where we will prepare our app for production using RDS, S3 and traefik.
You can find the source code of this article on my github
1) Setting up our project
Will use an existing project as a base for this tutorial. You can find it here
This project is a Nuxt app and a Django REST API. I have a made a 2 part tutorial where we build this application.
Let's start by cloning the project.
git clone https://github.com/florianbgt/Nuxt-Django-REST-Docker
One the project cloned, we can run docker compose to make the database migrations and create a superuser to access Django's admin page
docker-compose run api python manage.py migrate
docker-compose run api python manage.py createsuperuser
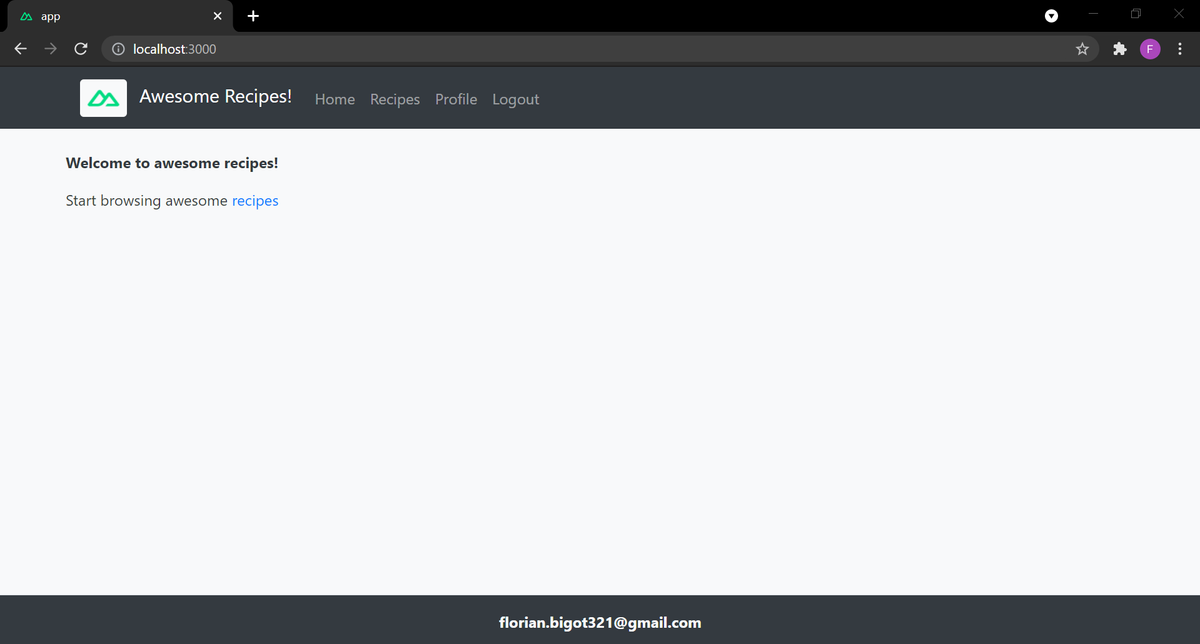
We then can spin up our containers using docker-compose up and the app should be up and running!
- frontend accessible at http://localhost:3000/
- backend accessible at http://localhost:8000/
2) Using RDS instead of our dockerized database
For production, we are going to use AWS RDS database.
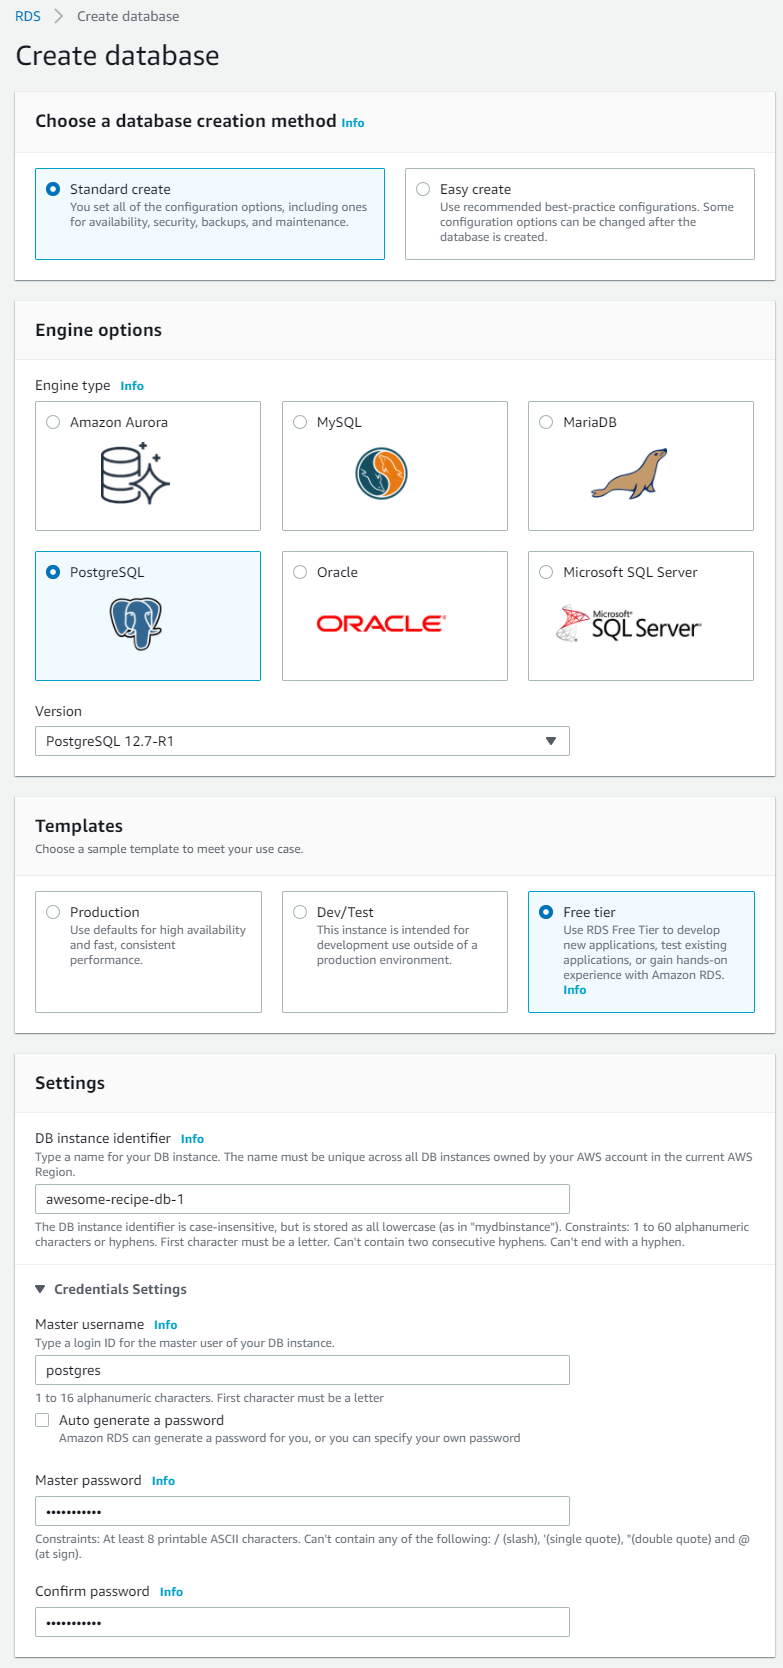
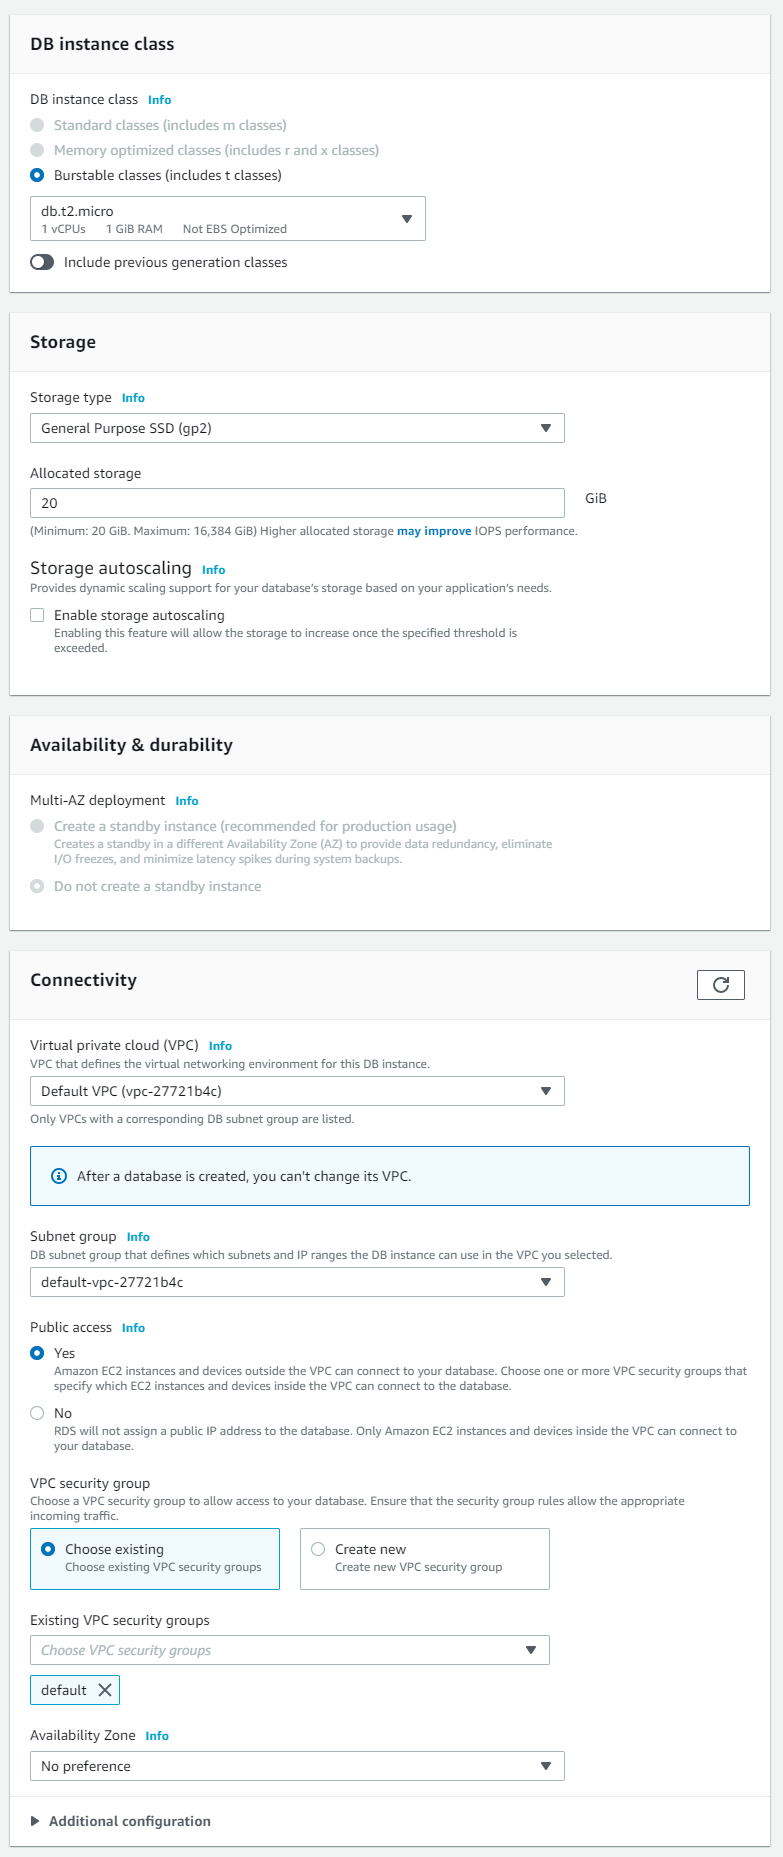
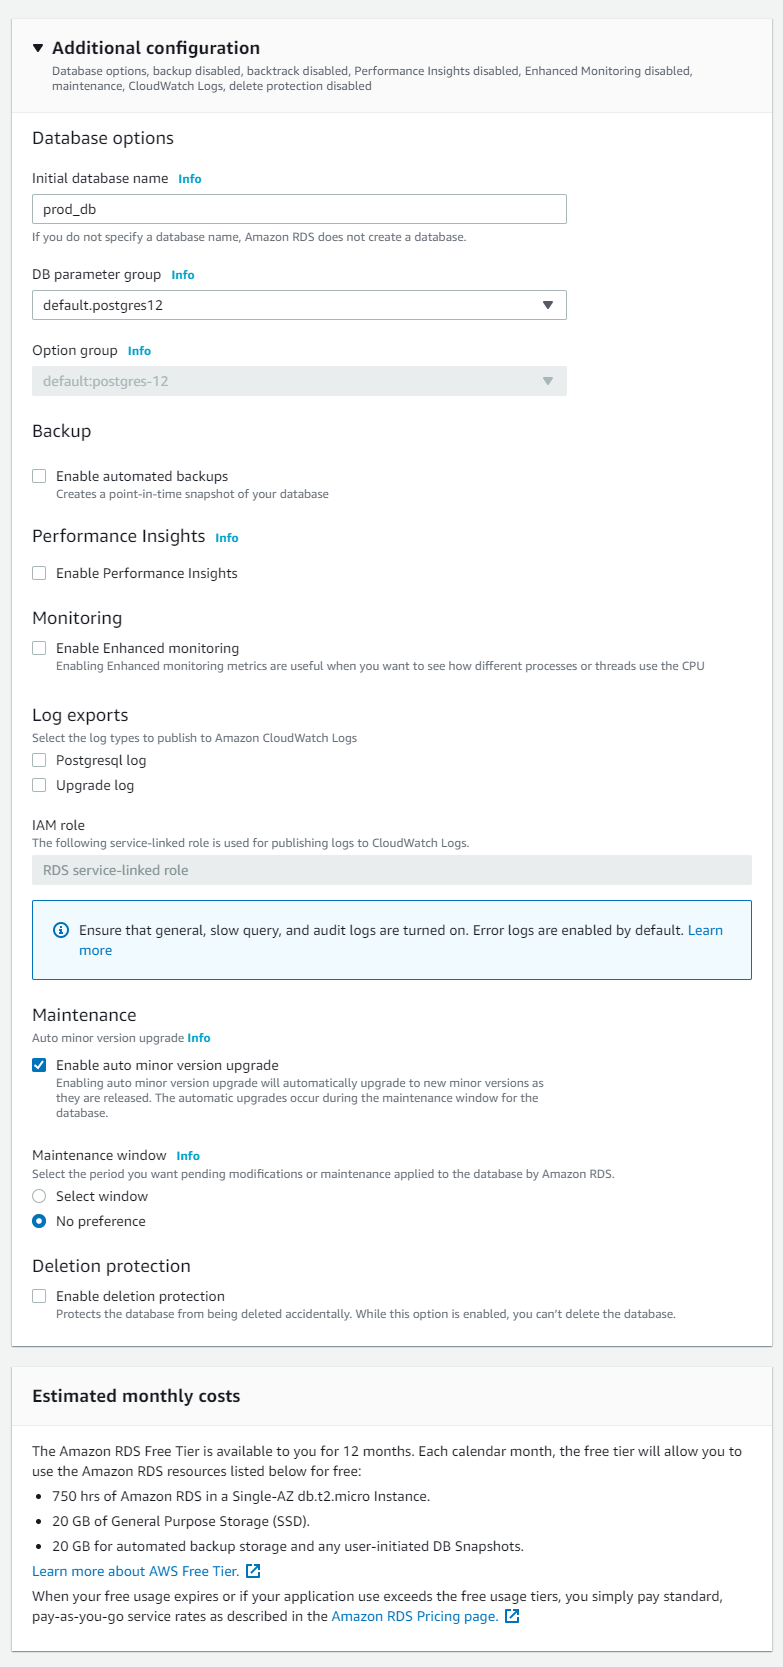
For this start to login into AWS console and go to services > Database > RDS > Create database
Then, we use the following settings and create the database.
We now need to tell Django to use our AWS database. However, we will not expose the database information in the code. instead, we will environement variables.
We start by creating a .env file to keep our environement variables.
touch .env
### .env
USE_RDS=1
RDS_NAME=prod_db
RDS_USER=postgres
RDS_PASSWORD=<your password>
RDS_HOST=<db endpoint>
RDS_PORT=5432
We then modify our settings.py to include RDS database.
### api/_project/settings.py
...
if bool(int(os.environ.get('USE_RDS'))):
    DATABASES = {
        'default': {
            'ENGINE': 'django.db.backends.postgresql',
            'NAME': os.environ.get('RDS_NAME'),
            'USER': os.environ.get('RDS_USER'),
            'PASSWORD': os.environ.get('RDS_PASSWORD'),
            'HOST': os.environ.get('RDS_HOST'),
            'PORT': 5432,
        }
    }
else:
    DATABASES = {
        'default': {
            'ENGINE': 'django.db.backends.postgresql',
            'NAME': 'postgres',
            'USER': 'postgres',
            'PASSWORD': 'postgres',
            'HOST': 'db',
            'PORT': 5432,
        }
    }
...
Finaly, we modify our docker-compose.yml to include our environement variables file.
### docker-compose.yml
---
api:
  restart: always
  build:
    context: api
    dockerfile: Dockerfile
  command: python manage.py runserver 0.0.0.0:8000
  volumes:
    - ./api:/code
    - ./media:/media
  ports:
    - "8000:8000"
  depends_on:
    - db
  env_file:
    - .env
As we are now using a new database, we need to apply our migrations, recreate a superuser again.
docker-compose run api python manage.py migrate
docker-compose run api python manage.py createsuperuser
We now can spin up our container using docker-compose up and now use our app with the RDS database!
3) Using S3 to store our media files
For production, we are going to use AWS S3 to store and retrieve our media files.
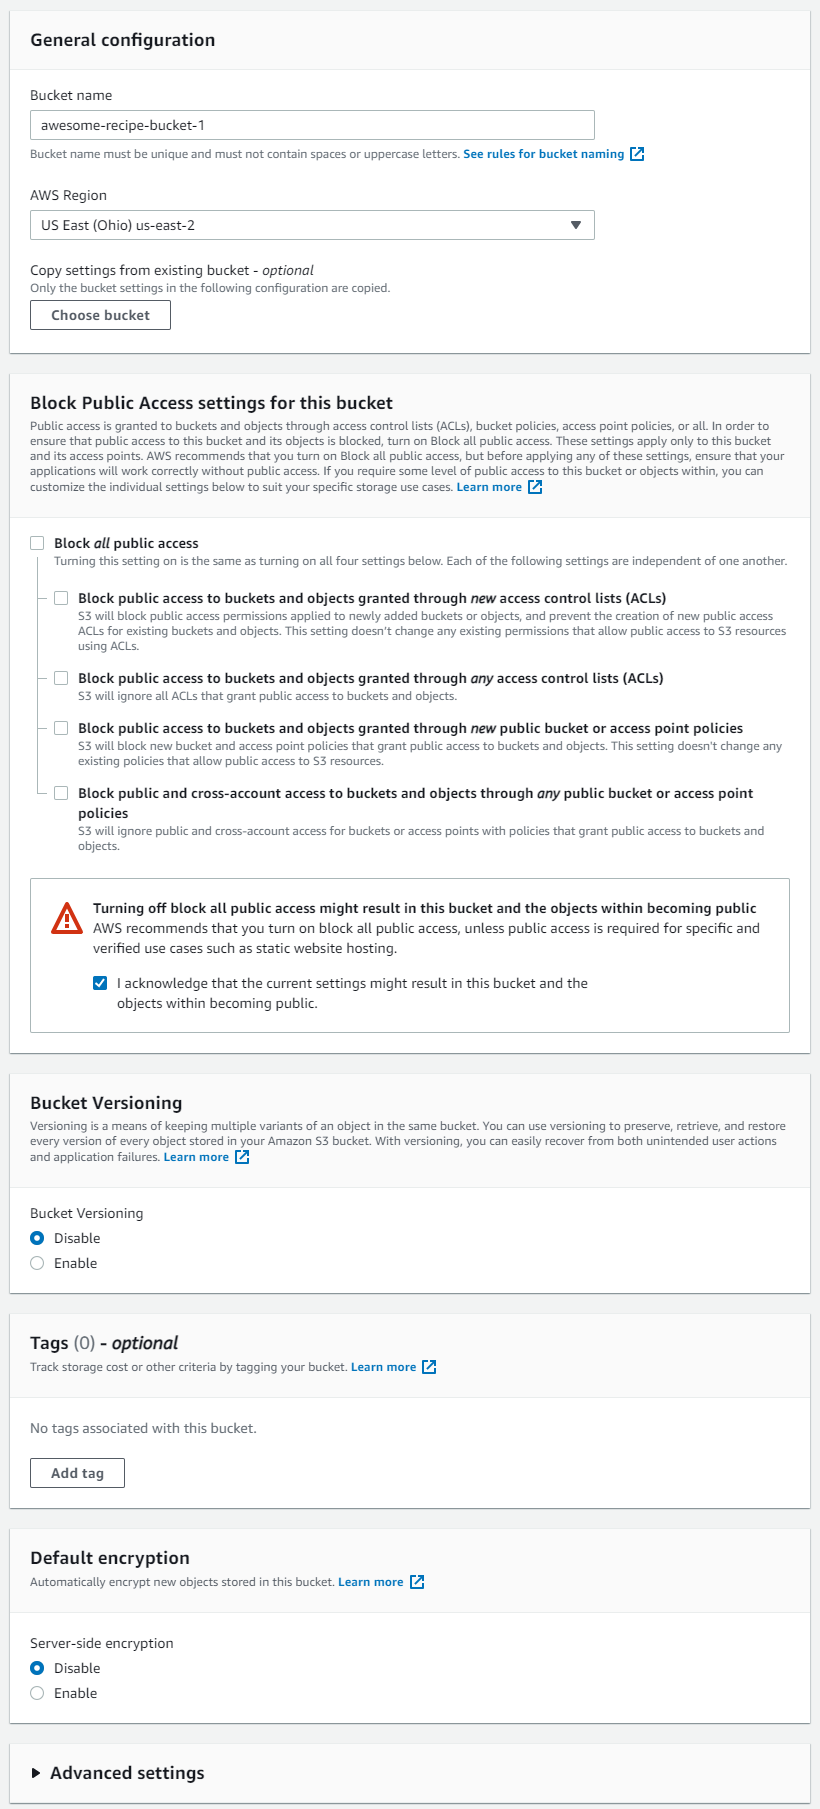
For this start to login into AWS console and go to services > Storage > S3 > Create bucket
Then, we use the following settings and create the S3 bucket.
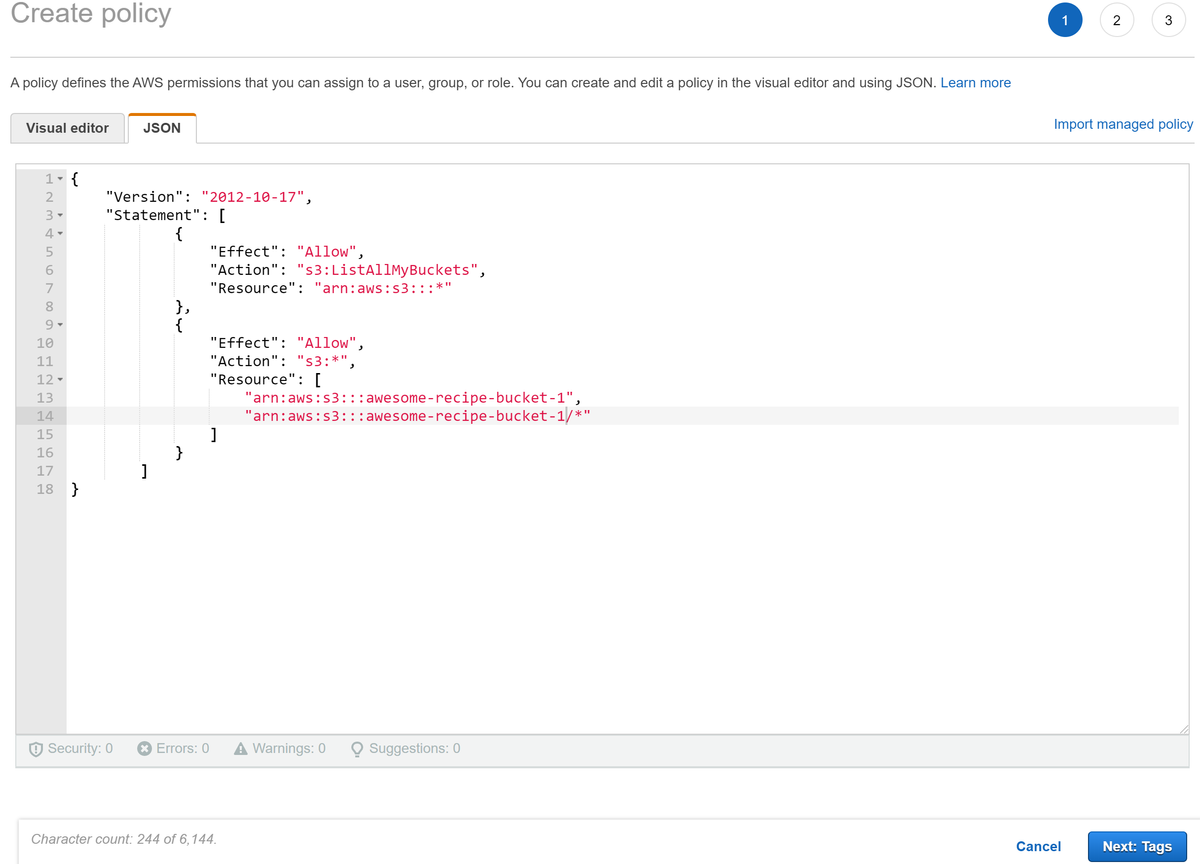
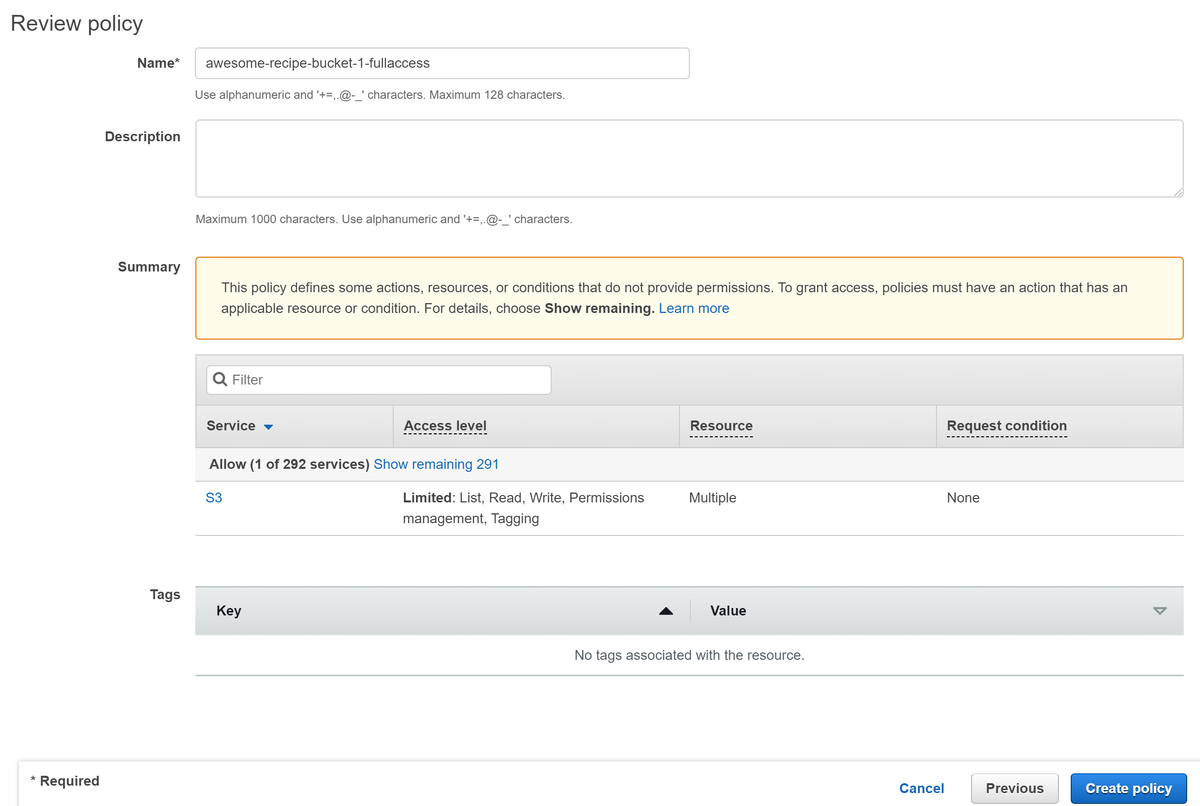
To access our bucket, we then need to create a user and give it the right to edit the bucket.
We are doing it through the AWS IAM.
Go to services > Security, Identity, & Compliance > IAM > Policies > Create Policy
Then, go to services > Security, Identity, & Compliance > IAM > Users > Add users

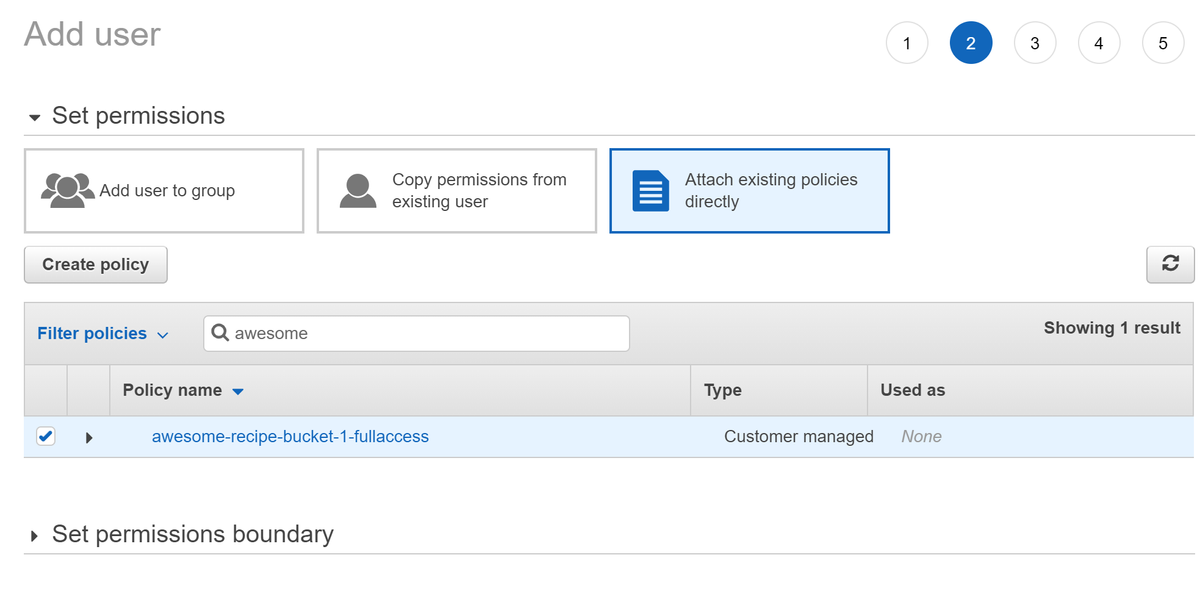
Once our user created, we can store the access key ID and secret access key inside our environement variables.
### .env
USE_RDS=1
RDS_NAME=prod_db
RDS_USER=postgres
RDS_PASSWORD=<your password>
RDS_HOST=<db endpoint>
RDS_PORT=5432
USE_S3=1
AWS_ACCESS_ID=<your access id>
AWS_ACCESS_SECRET=<your access secret>
AWS_S3_BUCKET_NAME=awesome-recipe-bucket-1
AWS_S3_BUCKET_REGION=us-east-2
To setup S3 bucket in our Django project, we are going to use the django-storages library.
We include this library in our requirements.txt.
### api/requirements.txt
Django==3.2
psycopg2-binary==2.9.1
djangorestframework==3.12.4
djangorestframework-simplejwt==4.7.2
django-rest-passwordreset==1.2.0
django-cleanup==5.2.0
Pillow==8.3.1
django-cors-headers==3.8.0
django-storages==1.11.1
We then modify our settings.py to include S3.
### api/_project/settings.py
...
INSTALLED_APPS = [
    'django.contrib.admin',
    'django.contrib.auth',
    'django.contrib.contenttypes',
    'django.contrib.sessions',
    'django.contrib.messages',
    'django.contrib.staticfiles',
    # local
    'users',
    'recipes',
    # 3rd party
    'rest_framework',
    'django_rest_passwordreset',
    'corsheaders',
    'storages'
    'django_cleanup',   #need to be last
]
...
MEDIA_URL = '/api/media/'
if bool(int(os.environ.get('USE_S3'))):
    AWS_ACCESS_KEY_ID = os.environ.get('AWS_ACCESS_ID')
    AWS_SECRET_ACCESS_KEY = os.environ.get('AWS_ACCESS_SECRET')
    AWS_STORAGE_BUCKET_NAME = os.environ.get('AWS_S3_BUCKET_NAME')
    AWS_S3_REGION_NAME = os.environ.get('AWS_S3_BUCKET_REGION')
    AWS_S3_SIGNATURE_VERSION = 's3v4'
    AWS_S3_FILE_OVERWRITE = False
    AWS_S3_ADDRESSING_STYLE = 'virtual'
    DEFAULT_FILE_STORAGE = 'storages.backends.s3boto3.S3Boto3Storage'
else:
    MEDIA_ROOT = os.path.join(BASE_DIR.parent, 'media').replace('\\', '/')
...
We now can rebuild our container using docker-compose up --build and our app is now using AWS S3 to store media files!
4) Setting up traefik
Traefik is a load balancer and a reverse proxy. With traefik, we are going to redirect the request to our API or our Nuxt app according to the URL.
To include traefik, we simply add it to our services in our docker-compose.yml file. the configuration is done by adding labels to other services.
### docker-compose.yml
version: "3.9"

services:
  db:
    image: postgres:13.4
    volumes:
      - ./db:/var/lib/postgresql/data
    environment:
      - POSTGRES_DB=postgres
      - POSTGRES_USER=postgres
      - POSTGRES_PASSWORD=postgres
  api:
    restart: always
    build:
      context: api
      dockerfile: Dockerfile
    command: python manage.py runserver 0.0.0.0:8000
    volumes:
      - ./api:/code
      - ./media:/media
    depends_on:
      - db
    env_file:
      - .env
    labels:
      - traefik.enable=true
      - traefik.http.routers.api.rule=Host(`api.${DOMAIN}`)
      - traefik.http.services.api.loadbalancer.server.port=8000
      - traefik.http.routers.api.tls=true
  app:
    restart: always
    build:
      context: app
      dockerfile: Dockerfile
    command: npm run dev
    volumes:
      - ./app:/code
      - /code/node_modules
      - /code/.nuxt
    env_file:
      - .env
    labels:
      - traefik.enable=true
      - traefik.http.routers.app.rule=Host(`${DOMAIN}`)
      - traefik.http.services.app.loadbalancer.server.port=3000
      - traefik.http.routers.app.tls=true
  traefik:
    image: traefik:v2.5
    command:
      - --providers.docker=true
      - --providers.docker.exposedbydefault=false
      - --entrypoints.web.address=:80
      - --entrypoints.websecure.address=:443
      - --entrypoints.web.http.redirections.entryPoint.to=websecure
      - --entrypoints.web.http.redirections.entryPoint.scheme=https
    ports:
      - 80:80
      - 443:443
    volumes:
      - /var/run/docker.sock:/var/run/docker.sock:ro
We also include a DOMAIN environement variable inside our .env file.
### .env
USE_RDS=1
RDS_NAME=prod_db
RDS_USER=postgres
RDS_PASSWORD=<your password>
RDS_HOST=<db endpoint>
RDS_PORT=5432
USE_S3=1
AWS_ACCESS_ID=<your access id>
AWS_ACCESS_SECRET=<your access secret>
AWS_S3_BUCKET_NAME=awesome-recipe-bucket-1
AWS_S3_BUCKET_REGION=us-east-2
DOMAIN=app.localhost
Moreover, as our domain changed (from localhost to app.localhost) we need to modify our settings.py file. Instead, of hard code the domain, we will here use our nealy created DOMAIN variable.
### api/_project/settings.py
...
ALLOWED_HOSTS = ['api.' + os.environ.get('DOMAIN'), 'api']
...
CORS_ALLOWED_ORIGINS = ["https://" + os.environ.get("DOMAIN")]
...
Finally, we need to modify our nuxt.config.js to modify our API url.
### app/nuxt.config.js
...
publicRuntimeConfig: {
  axios: {
    browserBaseURL: `https://api.${process.env.DOMAIN}`,
  },
},
...
5) Final touch
Let's change a few thing for optimizing our project a bit!
Let's start by modifying out settings.py and .env to make our project more portable and secure.
### api/_project/settings.py
...
DEBUG = int(os.environ.get("DEBUG"))

SESSION_COOKIE_SECURE = True
CSRF_COOKIE_SECURE = True
...
### .env
USE_RDS=1
RDS_NAME=prod_db
RDS_USER=postgres
RDS_PASSWORD=<your password>
RDS_HOST=<db endpoint>
RDS_PORT=5432
USE_S3=1
AWS_ACCESS_ID=<your access id>
AWS_ACCESS_SECRET=<your access secret>
AWS_S3_BUCKET_NAME=awesome-recipe-bucket-1
AWS_S3_BUCKET_REGION=us-east-2
DOMAIN=app.localhost
DEBUG=1
Then, we are going to create a new docker-compose.prod.yml file.
This file will be use for production. In this file:
- We remove our
dbservices - We run our Django API using Gunicorn instead of Django dev server
- Use whitenoise to serve our static files
- We use a production
Dockerfile.prodto build our Nuxt image and run our app usingnpm run start - We remove all volumes
touch docker-compose.prod.yml
touch app/Dockerfile.prod
### docker-compose.prod.yml
version: "3.9"

services:
  api:
    restart: always
    build:
      context: api
      dockerfile: Dockerfile
    command: gunicorn --bind=0.0.0.0:8000 --workers=2 --threads=4 --reload _project.wsgi
    env_file:
      - .env
    labels:
      - traefik.enable=true
      - traefik.http.routers.api.rule=Host(`api.${DOMAIN}`)
      - traefik.http.services.api.loadbalancer.server.port=8000
      - traefik.http.routers.api.tls=true
  app:
    restart: always
    build:
      context: app
      dockerfile: Dockerfile.prod
    command: npm run start
    env_file:
      - .env
    labels:
      - traefik.enable=true
      - traefik.http.routers.app.rule=Host(`${DOMAIN}`)
      - traefik.http.services.app.loadbalancer.server.port=3000
      - traefik.http.routers.app.tls=true
  traefik:
    image: traefik:v2.5
    command:
      - --providers.docker=true
      - --providers.docker.exposedbydefault=false
      - --entrypoints.web.address=:80
      - --entrypoints.websecure.address=:443
      - --entrypoints.web.http.redirections.entryPoint.to=websecure
      - --entrypoints.web.http.redirections.entryPoint.scheme=https
    ports:
      - 80:80
      - 443:443
    volumes:
      - /var/run/docker.sock:/var/run/docker.sock:ro
### app/Dockerfile.prod
FROM node:16.6
WORKDIR /code
COPY package*.json /code/
RUN npm install
ENV NUXT_HOST 0.0.0.0
COPY . .
RUN npm run build
To run our Django API, we are going to use Gunicorn instead of Django dev server.
To install it, we modify our requirements.txt file. Will do the same for whitenoise
### api/_project/requirements.txt
Django==3.2
psycopg2-binary==2.9.1
djangorestframework==3.12.4
djangorestframework-simplejwt==4.7.2
django-rest-passwordreset==1.2.0
django-cleanup==5.2.0
Pillow==8.3.1
django-cors-headers==3.8.0
django-storages==1.11.1
boto3==1.18.43
gunicorn==20.1.0
whitenoise==5.3.0
We then modify our settings.py to use whitenoise.
### api/settings.py
...
MIDDLEWARE = [
    'corsheaders.middleware.CorsMiddleware', #need to be first
    'django.middleware.security.SecurityMiddleware',
    'whitenoise.middleware.WhiteNoiseMiddleware', #need to be above all but security middleware
    'django.contrib.sessions.middleware.SessionMiddleware',
    'django.middleware.common.CommonMiddleware',
    'django.middleware.csrf.CsrfViewMiddleware',
    'django.contrib.auth.middleware.AuthenticationMiddleware',
    'django.contrib.messages.middleware.MessageMiddleware',
    'django.middleware.clickjacking.XFrameOptionsMiddleware',
]
...
We now can rebuild our images and spin up our containers using the following command.
docker-compose -f docker-compose.prod.yml up --build
Conclusion
Our application is now production ready!
In the Part 2 of this tutorial, we will see how to deploy it on the cloud using AWS ECS.
You can find the source code of this article on my github
If you have any question or just want to chat, feel free to email me florian.bigot321@gmail.com