In this article, we will setup an Oauth2 authenticartion server with Django.
This server will be a REST API usable by other services for authentication using email and password.
This is the part 2 of the tutorial where we will setup the resource server
You can find the source code on my github
1) Setting up our project
In this section, we are going to setup our project the same way we did in the Part1 of this article
If you need more details about how things work, do not hesitate to check the Part1
Here is the code below:
mkdir Django-rest-oauth2-resource-server
cd Django-rest-oauth2-resource-server
python -m venv env
### if you are using Windows
env\scripts\activate
### if you are using Mac or Linux
source env/bin/activate
pip install django
django-admin startproject _project .
python manage.py startapp users
touch users/managers.py
touch users/forms.py
### users/managers.py
from django.contrib.auth.base_user import BaseUserManager


class CustomUserManager(BaseUserManager):
    def create_user(self, email, password, **extra_fields):
        if not email:
            raise ValueError('The Email must be set')
        email = self.normalize_email(email)
        user = self.model(email=email, **extra_fields)
        user.set_password(password)
        user.save()
        return user

    def create_superuser(self, email, password, **extra_fields):
        extra_fields.setdefault('is_staff', True)
        extra_fields.setdefault('is_superuser', True)
        extra_fields.setdefault('is_active', True)
        if extra_fields.get('is_staff') is not True:
            raise ValueError('Superuser must have is_staff=True.')
        if extra_fields.get('is_superuser') is not True:
            raise ValueError('Superuser must have is_superuser=True.')
        return self.create_user(email, password, **extra_fields)
### users/models.py
from django.db import models
from django.contrib.auth.models import AbstractUser
from .managers import CustomUserManager


class CustomUser(AbstractUser):
    username = None
    first_name = None
    last_name = None
    email = models.EmailField(max_length=50, unique=True)

    USERNAME_FIELD = 'email'

    objects = CustomUserManager()

    def __str__(self):
        return self.email
### users/forms.py
from django.contrib.auth.forms import UserCreationForm, UserChangeForm
from .models import CustomUser


class CustomUserCreationForm(UserCreationForm):
    class Meta:
        model = CustomUser
        fields = ('email',)


class CustomUserChangeForm(UserChangeForm):
    class Meta:
        model = CustomUser
        fields = ('email',)
### users/admin.py
from django.contrib import admin
from django.contrib.auth.admin import UserAdmin

from .forms import CustomUserCreationForm, CustomUserChangeForm
from .models import CustomUser


class CustomUserAdmin(UserAdmin):
    add_form = CustomUserCreationForm
    form = CustomUserChangeForm
    model = CustomUser
    list_display = ('email', 'is_staff', 'is_active',)
    list_filter = ('email', 'is_staff', 'is_active',)
    fieldsets = (
        ('Credentials', {'fields': ('email', 'password')}),
        ('Permissions', {'fields': ('is_staff', 'is_active', 'groups')}),
    )
    add_fieldsets = (
        (None, {
            'classes': ('wide',),
            'fields': ('email', 'password1', 'password2', 'is_staff', 'is_active')}
        ),
    )
    search_fields = ('email',)
    ordering = ('email',)


admin.site.register(CustomUser, CustomUserAdmin)
### _project/settings.py
...
INSTALLED_APPS = [
    'django.contrib.admin',
    'django.contrib.auth',
    'django.contrib.contenttypes',
    'django.contrib.sessions',
    'django.contrib.messages',
    'django.contrib.staticfiles',
    #local
    'users',
]

AUTH_USER_MODEL = 'users.CustomUser'
...
### _project/urls.py
from django.contrib import admin
from django.urls import path, include

urlpatterns = [
    path('admin/', admin.site.urls),
    path('users/', include('users.urls')),
]
python manage.py makemigrations users
python manage.py migrate
python manage.py createsuperuser
Email: admin@email.com
Password: testpass123
Password (again): testpass123
2) Setting up Oauth2 using Django Oauth Toolkit
The setup is going to be similar to the authentication server (see Part1).
pip install djangorestframework django-oauth-toolkit
The only difference are the introspection settings (RESOURCE_SERVER_INTROSPECTION_URL and RESOURCE_SERVER_INTROSPECTION_CREDENTIALS). These 2 settings will allow our resource server to communicate with our authorization server to get information about our users
In RESOURCE_SERVER_INTROSPECTION_CREDENTIALS, you need to put the client Id and client Secret we created in the Part1 of this article
Because of this communication between our 2 server, we do not need (or want in this example) to add Oauth Toolkit in our _project/urls.py
### _projects/settings.py
...
INSTALLED_APPS = [
    'django.contrib.admin',
    'django.contrib.auth',
    'django.contrib.contenttypes',
    'django.contrib.sessions',
    'django.contrib.messages',
    'django.contrib.staticfiles',
    #local
    'users',
    #3rd party
    'rest_framework',
    'oauth2_provider',
]

AUTH_USER_MODEL = 'users.CustomUser'

OAUTH2_PROVIDER = {
    'SCOPES': {
        'read': 'Read scope',
        'write': 'Write scope',
    },
    'RESOURCE_SERVER_INTROSPECTION_URL': 'http://localhost:8000/o/introspect/',
    'RESOURCE_SERVER_INTROSPECTION_CREDENTIALS': ('rs-id','rs-secret'),
}

REST_FRAMEWORK = {
    'DEFAULT_AUTHENTICATION_CLASSES': (
        'oauth2_provider.contrib.rest_framework.OAuth2Authentication',
        'rest_framework.authentication.SessionAuthentication',
    ),
    'DEFAULT_PERMISSION_CLASSES': (
        'rest_framework.permissions.IsAuthenticated',
    )
}
...
3) Setup the user API views
In this section, we will setup views to allow new user to signup, login and change their password.
The idea here is not to have the user directly interact with our authentication server. We will for that setup API view that will forward the request from the resource server to the authentication server:
touch users/serializers.py
touch users/urls.py
We first start to create 3 simple serializer for each of out views:
### users/serializers.py
from rest_framework import serializers


class SignUpSerializer(serializers.Serializer):
    email = serializers.EmailField()
    password = serializers.CharField()
    password2 = serializers.CharField()


class TokenSerializer(serializers.Serializer):
    email = serializers.EmailField()
    password = serializers.CharField()


class RefreshTokenSerializer(serializers.Serializer):
    refresh = serializers.EmailField()


class PasswordChangeSerializer(serializers.Serializer):
    old_password = serializers.CharField()
    password = serializers.CharField()
    password2 = serializers.CharField()
Then, we setup our views:
- For the signup view, we send a http request to our authentication server with the new user information. We then forward back the response from the authentication server to the user
- We do the same thing for the login view (GetTokenView) and refresh view (RefreshTokenView). That also allow us to keep the client id and client secret we created in the Part 1 of this article secret!
- Same thing in the password change view. But here, we also pass the authorization header to the authentication server. That will allow the authentication server to identify the user
### users/views.py
from rest_framework.views import APIView
from rest_framework.response import Response
from rest_framework.permissions import AllowAny

from .serializers import SignUpSerializer, TokenSerializer, RefreshTokenSerializer, PasswordChangeSerializer

import requests


class SignUpView(APIView):
    permission_classes = [AllowAny]
    serializer_class = SignUpSerializer
    def post(self, request):
        response = requests.post(
            'http://localhost:8000/users/signup/',
            data={
                'email': request.data['email'],
                'password': request.data['password'],
                'password2': request.data['password2']
            }
        )
        return Response(response.json())

class GetTokenView(APIView):
    permission_classes = [AllowAny]
    serializer_class = TokenSerializer
    def post(self, request):
        response = requests.post(
            'http://localhost:8000/o/token/',
            data={
                'grant_type': 'password',
                'username': request.data['email'],
                'password': request.data['password'],
                'client_id': 'rs-id',
                'client_secret': 'rs-secret'
            }
        )
        return Response(response.json())


class RefreshTokenView(APIView):
    permission_classes = [AllowAny]
    serializer_class = RefreshTokenSerializer
    def post(self, request):
        response = requests.post(
            'http://localhost:8000/o/token/',
            data={
                'grant_type': 'refresh_token',
                'refresh_token': request.data['refresh'],
                'client_id': 'rs-id',
                'client_secret': 'rs-secret'
            }
        )
        return Response(response.json())


class PasswordChangeView(APIView):
    serializer_class = PasswordChangeSerializer
    def put(self, request):
        response = requests.put(
            'http://localhost:8000/users/password/',
            headers={
                'Authorization': request.META.get('HTTP_AUTHORIZATION')
            },
            data={
                'old_password': request.data['old_password'],
                'password': request.data['password'],
                'password2': request.data['password2']
            }
        )
        return Response(response.json())
Finally, setup our routes:
### users/urls.py
from django.urls import path
from .views import SignUpView, GetTokenView, RefreshTokenView ,PasswordChangeView


urlpatterns = [
    path('signup/', SignUpView.as_view()),
    path('token/', GetTokenView.as_view()),
    path('token/refresh/', RefreshTokenView.as_view()),
    path('password/', PasswordChangeView.as_view())
]
## _project/urls.py
from django.contrib import admin
from django.urls import path, include

urlpatterns = [
    path('admin/', admin.site.urls),
    path('users/', include('users.urls')),
]
We can now test our views using postman. For this, we run both the autentication server and the resource server. The authentication is ran on port 8000 and the resource server on port 8001:
python manage.py runserver localhost:8000       ### auth server
python manage.py runserver localhost:8001       ### resource server
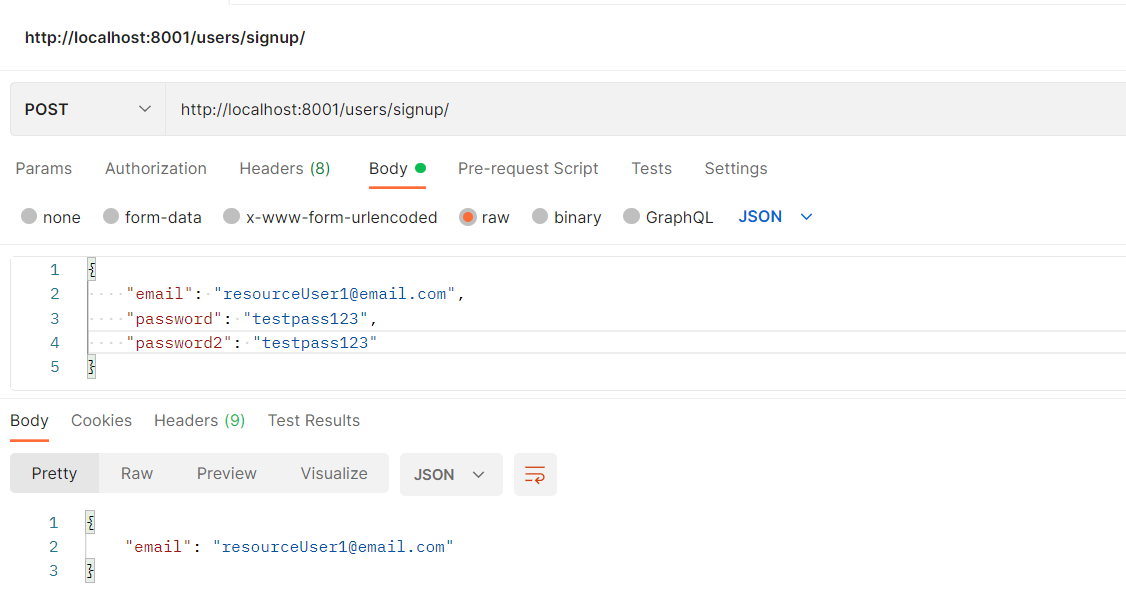
Let's now create a new user from our resource server using the following http request with postman:

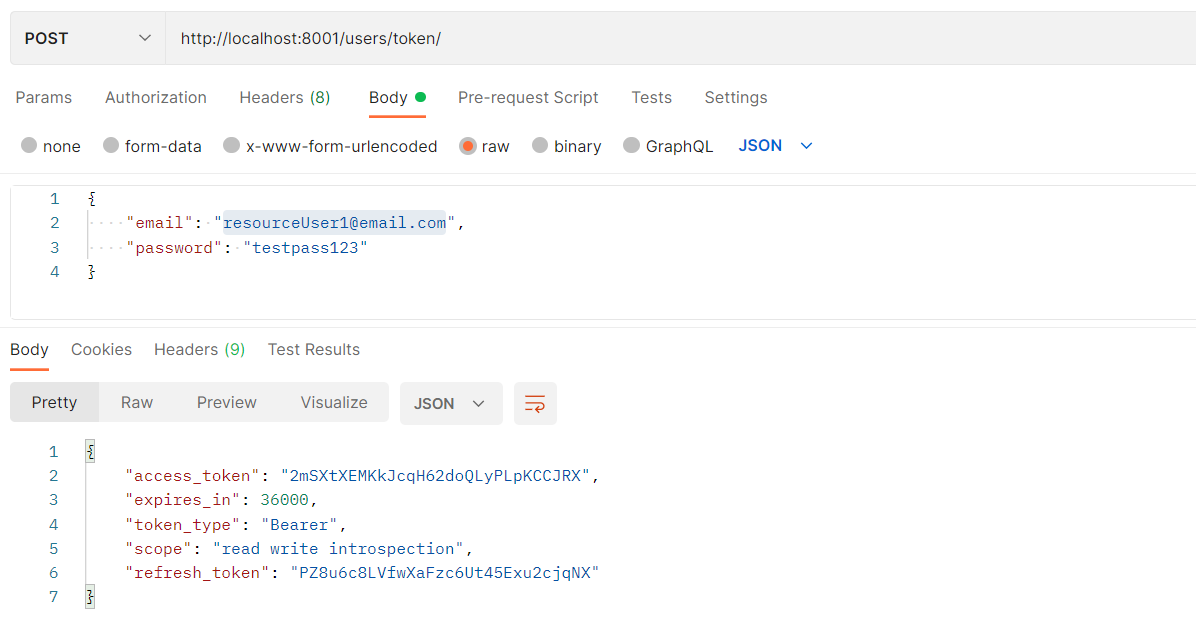
We now authenticate that user from the resource server as well:

We finally change the user's password from the resource as well using this http request. Here, we need to attached the access token in a authorization header (type Bearer):

In the background, our resource server will check in its database if a user exist and a valid access token exists:
- If it does, the user will be granted access
- If it does not, the resource server will check if the user exists and if a valid access token exists in the authentication server. If it does, user will be granted access
- If none of the 2 conditions above are met, the user will be denied access
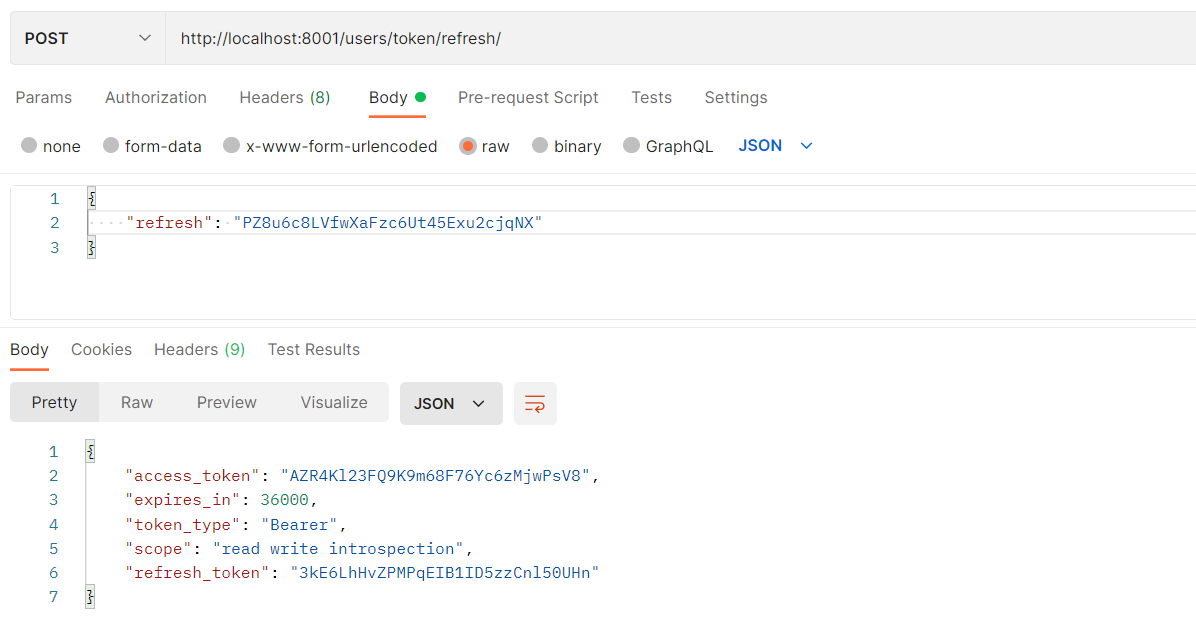
Some time has passed and our access token has expired. We can also renew it using this http request:

4) Create a dummy item API
In this section, we will setup a dummy item API. That will allow us to test the whole Oauth2 setup in a realistic environement
This API will use generics django rest views:
python startapp items
touch items/urls.py
touch items/serializers.py
### items/models.py
from django.db import models
from django.contrib.auth import get_user_model

User = get_user_model()


class Item(models.Model):
    name = models.CharField(max_length=50, unique=True)
    description = models.TextField(max_length=250)
    price = models.DecimalField(max_digits=14, decimal_places=2)
    user = models.ForeignKey(User, on_delete=models.CASCADE)

    def __str__(self):
        return self.name
### items/admin.py
from django.contrib import admin

from .models import Item


class ItemAdmin(admin.ModelAdmin):
    pass

admin.site.register(Item, ItemAdmin)
### items/serializers.py
from rest_framework import serializers
from rest_framework.fields import ReadOnlyField
from django.contrib.auth import get_user_model

from .models import Item

User = get_user_model()


class UserSerializer(serializers.ModelSerializer):
    class Meta:
        model = User
        fields = ['id', 'email']


class ItemSerializer(serializers.ModelSerializer):
    user = UserSerializer(read_only=True)

    class Meta:
        model = Item
        fields = ['id', 'name', 'description', 'price', 'user',]

    def create(self, validated_data):
        item = Item.objects.create(
            name=validated_data['name'],
            description=validated_data['description'],
            price = validated_data['price'],
            user = self.context['request'].user
        )
        return item
### items/views.py
from rest_framework import generics

from .models import Item
from .serializers import ItemSerializer


class ItemList(generics.ListCreateAPIView):
    queryset = Item.objects.all()
    serializer_class = ItemSerializer


class ItemDetail(generics.RetrieveUpdateDestroyAPIView):
    queryset = Item.objects.all()
    serializer_class = ItemSerializer
### items/urls.py
from django.urls import path
from .views import ItemList, ItemDetail


urlpatterns = [
    path('', ItemList.as_view()),
    path('<pk>/', ItemDetail.as_view()),
]
### _project/urls.py
from django.contrib import admin
from django.urls import path, include

urlpatterns = [
    path('admin/', admin.site.urls),
    path('users/', include('users.urls')),
    path('items/', include('items.urls')),
]
### _project/settings.py
...
INSTALLED_APPS = [
    'django.contrib.admin',
    'django.contrib.auth',
    'django.contrib.contenttypes',
    'django.contrib.sessions',
    'django.contrib.messages',
    'django.contrib.staticfiles',
    #local
    'users',
    'items',
    #3rd party
    'rest_framework',
    'oauth2_provider',
]
...
python manage.py makemigrations items
python manage.py migrate
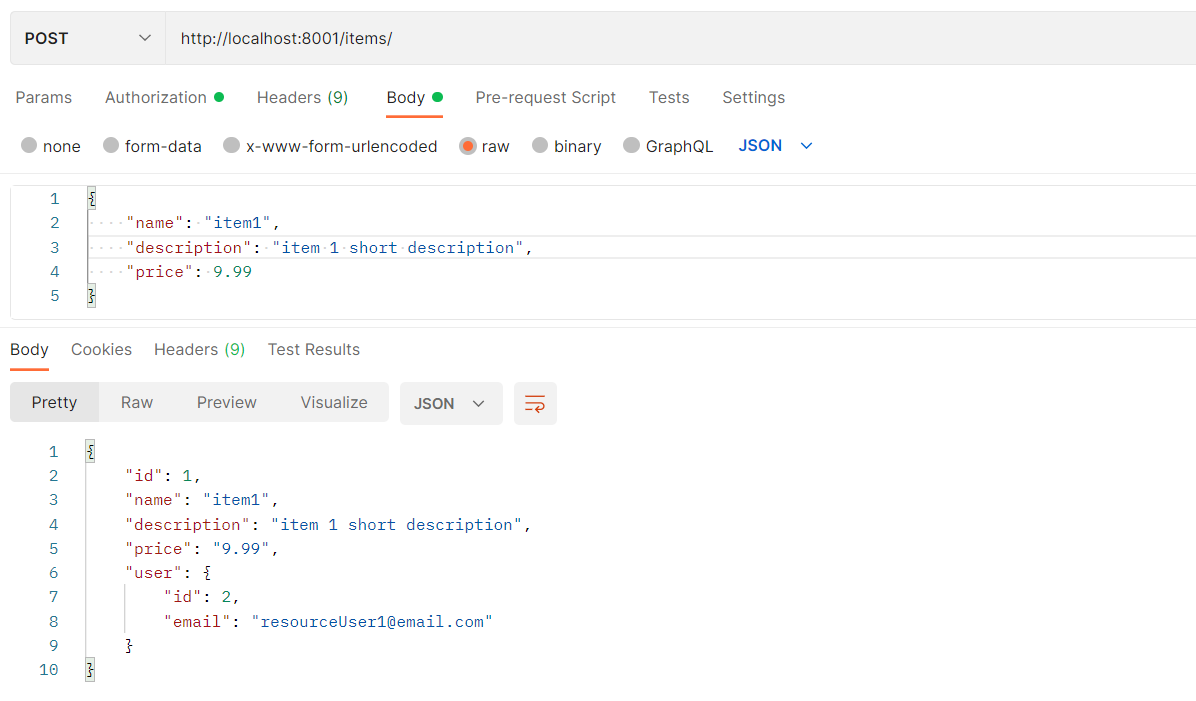
We can now create new items using the following http request. Here, we need to attached the access token in a authorization header (type Bearer):

We also can list, edit and delete new items according to the views we have setup
Clonclusion
We have now have a separate Oauth2 resource server setup!
We can create many other resource server using this setup while having one centralized authentication server which create a great user experience
You can find the source code of this article on my github
If you have any question or just want to chat, feel free to email me florian.bigot321@gmail.com