In this article, we will setup an Oauth2 authenticartion server with Django.
This server will be a REST API usable by other services for authentication using email and password.
This is the part 1 of the tutorial where we will setup the authentication server
You can find the source code on my github
1) Setting up our project
In this section, we will setu p our Django project and customize the default user model to implement email authentication
First, we create our virtualenvironement:
mkdir Django-rest-oauth2-auth-server
cd Django-rest-oauth2-auth-server
python -m venv env
### if you are using Windows
env\scripts\activate
### if you are using Mac or Linux
source env/bin/activate
We then install our dependencies and create our project
pip install django
django-admin startproject _project .
We now implement user authentication using email. First, we create an app users and a few files:
python manage.py startapp users
The first thing we are going to modify is Django user manager. This is where we tell Django how to create users. We do so by extending BaseUserManager:
### users/managers.py
from django.contrib.auth.base_user import BaseUserManager


class CustomUserManager(BaseUserManager):
    def create_user(self, email, password, **extra_fields):
        if not email:
            raise ValueError('The Email must be set')
        email = self.normalize_email(email)
        user = self.model(email=email, **extra_fields)
        user.set_password(password)
        user.save()
        return user

    def create_superuser(self, email, password, **extra_fields):
        extra_fields.setdefault('is_staff', True)
        extra_fields.setdefault('is_superuser', True)
        extra_fields.setdefault('is_active', True)
        if extra_fields.get('is_staff') is not True:
            raise ValueError('Superuser must have is_staff=True.')
        if extra_fields.get('is_superuser') is not True:
            raise ValueError('Superuser must have is_superuser=True.')
        return self.create_user(email, password, **extra_fields)
We then define our model. For this, we extend AbstractUser.
Here, we set all field the default field of the default user model to None exept for the email address.
We also ensure that the email address is unique as this field will be use for authentication (USERNAME_FIELD = 'email').
Here i the code below:
### users/models.py
from django.db import models
from django.contrib.auth.models import AbstractUser
from .managers import CustomUserManager


class CustomUser(AbstractUser):
    username = None
    first_name = None
    last_name = None
    email = models.EmailField(max_length=50, unique=True)

    USERNAME_FIELD = 'email'

    objects = CustomUserManager()

    def __str__(self):
        return self.email
Our custom user will not be shown in the admin by default. Let's fix that by appending UserCreationForm and UserChangeForm:
### users/forms.py
from django.contrib.auth.forms import UserCreationForm, UserChangeForm
from .models import CustomUser


class CustomUserCreationForm(UserCreationForm):
    class Meta:
        model = CustomUser
        fields = ('email',)


class CustomUserChangeForm(UserChangeForm):
    class Meta:
        model = CustomUser
        fields = ('email',)
We can now register these 2 forms and customize the admin page:
### users/admin.py
from django.contrib import admin
from django.contrib.auth.admin import UserAdmin

from .forms import CustomUserCreationForm, CustomUserChangeForm
from .models import CustomUser


class CustomUserAdmin(UserAdmin):
    add_form = CustomUserCreationForm
    form = CustomUserChangeForm
    model = CustomUser
    list_display = ('email', 'is_staff', 'is_active',)
    list_filter = ('email', 'is_staff', 'is_active',)
    fieldsets = (
        ('Credentials', {'fields': ('email', 'password')}),
        ('Permissions', {'fields': ('is_staff', 'is_active', 'groups')}),
    )
    add_fieldsets = (
        (None, {
            'classes': ('wide',),
            'fields': ('email', 'password1', 'password2', 'is_staff', 'is_active')}
        ),
    )
    search_fields = ('email',)
    ordering = ('email',)


admin.site.register(CustomUser, CustomUserAdmin)
Finally, we add our users app and register our CustomUser in our settings:
### _project/settings.py
...
INSTALLED_APPS = [
    'django.contrib.admin',
    'django.contrib.auth',
    'django.contrib.contenttypes',
    'django.contrib.sessions',
    'django.contrib.messages',
    'django.contrib.staticfiles',
    #local
    'users',
]

AUTH_USER_MODEL = 'users.CustomUser'
...
We can now migrate (It is very important not to migrate your database before the creation of our CustomUser)
We can also create our superuser, only email and password should be prompted:
python manage.py makemigrations users
python manage.py migrate
python manage.py createsuperuser
Email: admin@email.com
Password: testpass123
Password (again): testpass123
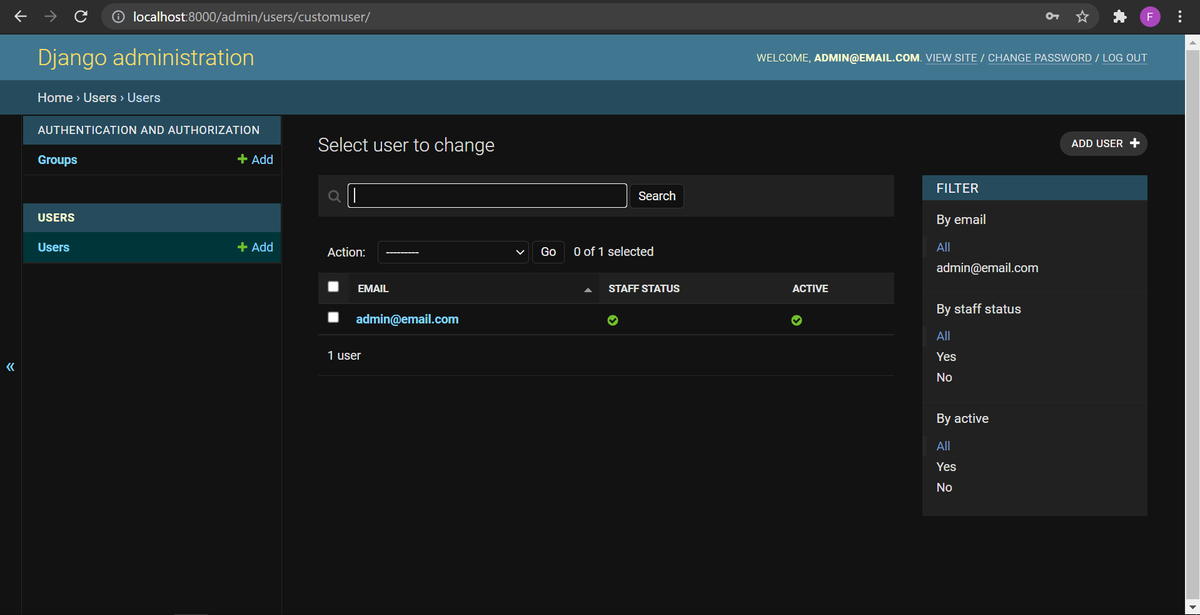
We now can spin up our server and go to http://localhost:8000/admin.
You should be prompted to login using your email instead of the default username.
python manage.py runserver
In the admin, we should also see our CustomUser display correctly:
2) Setting up Oauth2 using Django Oauth Toolkit
To setup Oauth2, we are going to use the Django Oauth Toolkit library
First, we start by installing the library. We also install django rest framework to create extra API endpoints that will be usefull in the Part 2 of this article:
pip install djangorestframework django-oauth-toolkit
We then configure Django rest framework and Django Oauth Tookit according to Oauth Toolkit documentation.
I will also include session authentication for the admin
Finally, I include the introspection scope. This scope will be used by the resource server we will setup in Part 2 of this article
### _project/settings.py
INSTALLED_APPS = [
    'django.contrib.admin',
    'django.contrib.auth',
    'django.contrib.contenttypes',
    'django.contrib.sessions',
    'django.contrib.messages',
    'django.contrib.staticfiles',
    #local
    'users',
    #3rd party
    'rest_framework',
    'oauth2_provider',
]

AUTH_USER_MODEL = 'users.CustomUser'

OAUTH2_PROVIDER = {
    'SCOPES': {
        'read': 'Read scope',
        'write': 'Write scope',
        'introspection': 'Introspect token scope',
    }
}

REST_FRAMEWORK = {
    'DEFAULT_AUTHENTICATION_CLASSES': (
        'oauth2_provider.contrib.rest_framework.OAuth2Authentication',
        'rest_framework.authentication.SessionAuthentication',
    ),
    'DEFAULT_PERMISSION_CLASSES': (
        'rest_framework.permissions.IsAuthenticated',
    )
}
We then can register Oauth Toolkit in our project urls:
### _project/urls.py
from django.contrib import admin
from django.urls import path, include

urlpatterns = [
    path('admin/', admin.site.urls),
    path('o/', include('oauth2_provider.urls', namespace='oauth2_provider')),
]
We now need to apply our migrations and spin up our server:
python manage.py migrate
python manage.py runserver
We now need to create an access to our Oauth. For this, we need to register an new applicartion in Oauth.
Django Oauth Toolkit provide a great interface for it at http://localhost:8000/o/applications/register/
CLick on register and fill the form as below:
- Name: resource-server
- Cliend id: rs-id,
- Client secret: rs-secret
- Client type: confidential
- Authorization grant type: Resource owner password-based
- Redirect uris: leave this empty
- Algorithm: No OIDC support
We can now request an access token by sending the following http request using Postman:
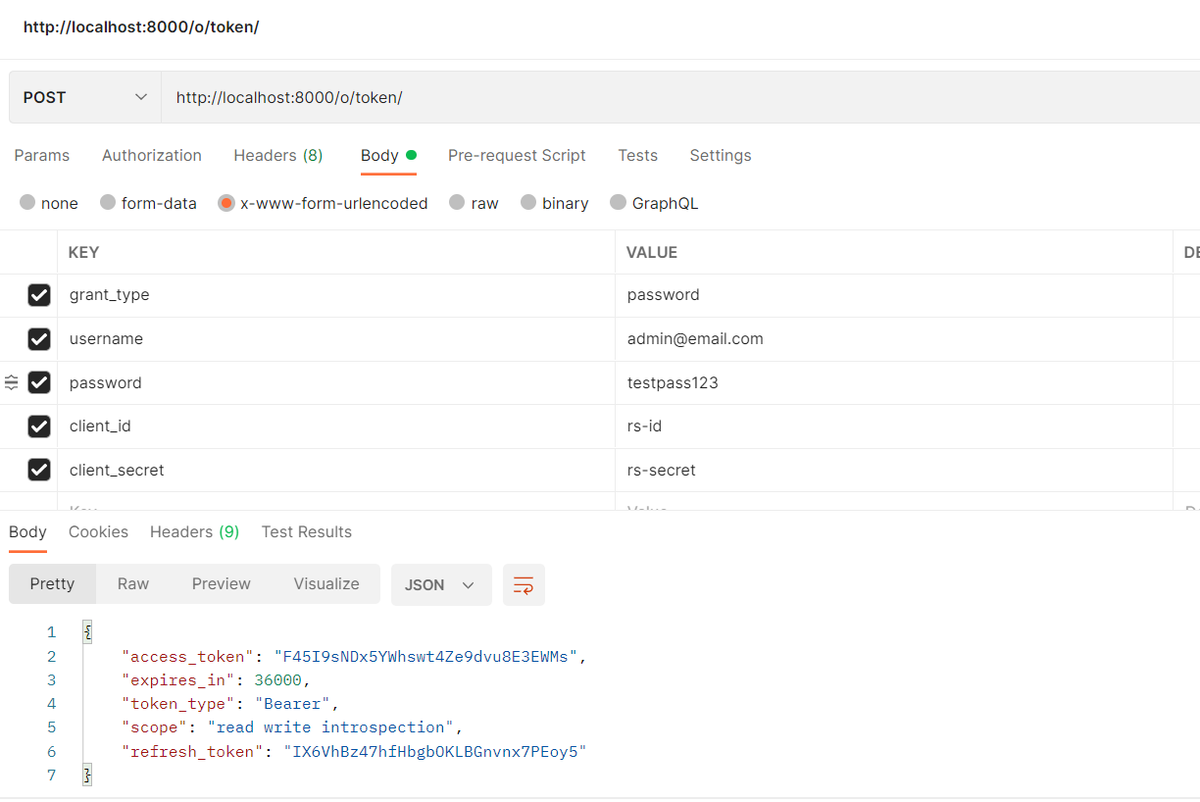
To access our future resources, we will attached the access token to all of our request.
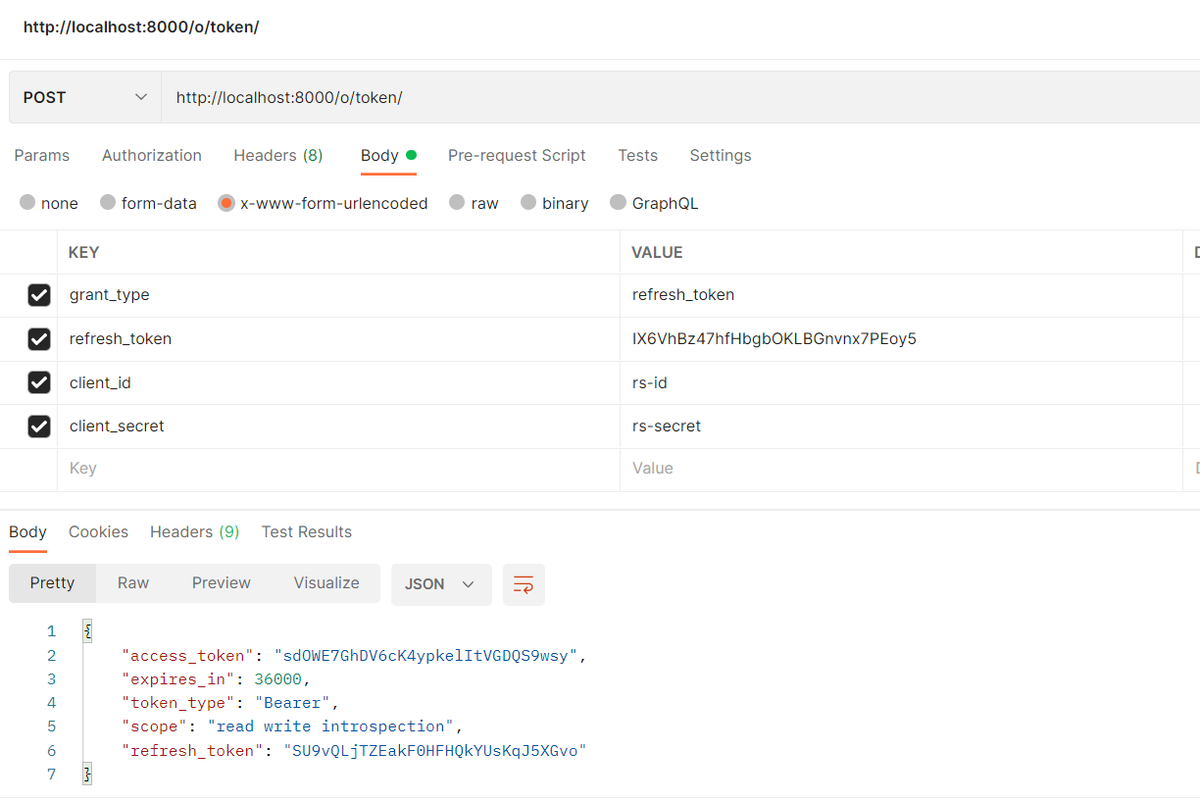
Once our token expire, we can request a new one using our long life refren token by sending the following http request:
3) Setup Signup and password change API views
We are now going to setup a signup and a password change API views.
We start by creating the serializers for these 2 view:
touch users/serializers.py
### users/serializers.py
from rest_framework import serializers
from django.contrib.auth import get_user_model
from django.contrib.auth.password_validation import validate_password
from rest_framework.validators import UniqueValidator

User = get_user_model()


class SignUpSerializer(serializers.ModelSerializer):
    email = serializers.EmailField(validators=[UniqueValidator(queryset=User.objects.all())])
    password = serializers.CharField(write_only=True, validators=[validate_password])
    password2 = serializers.CharField(write_only=True)

    class Meta:
        model = User
        fields = ['email', 'password', 'password2',]

    def validate(self, value):
        if value['password'] != value['password2']:
            raise serializers.ValidationError({'password2': 'Password fields did not match'})
        return value

    def create(self, validated_data):
        user = User.objects.create(email = validated_data['email'])
        user.set_password(validated_data['password'])
        user.save()
        return user


class PasswordChangeSerializer(serializers.ModelSerializer):
    password = serializers.CharField(write_only=True, required=True, validators=[validate_password])
    password2 = serializers.CharField(write_only=True, required=True)
    old_password = serializers.CharField(write_only=True, required=True)

    class Meta:
        model = User
        fields = ('old_password', 'password', 'password2')

    def validate_old_password(self, value):
        user = self.context['request'].user
        if not user.check_password(value):
            raise serializers.ValidationError({'old_password': 'Old password is incorrect'})
        return value

    def validate(self, value):
        if value['password'] != value['password2']:
            raise serializers.ValidationError({'password2': 'Password fields did not match'})
        return value

    def update(self, instance, validated_data):
        instance.set_password(validated_data['password'])
        instance.save()
        return instance
We then create the views:
### users/views.py
from rest_framework import generics
from rest_framework.permissions import AllowAny
from django.contrib.auth import get_user_model
from .serializers import SignUpSerializer, PasswordChangeSerializer

User = get_user_model()


class SignUp(generics.CreateAPIView):
    permission_classes = [AllowAny]
    serializer_class = SignUpSerializer


class PasswordChange(generics.UpdateAPIView):
    queryset = User
    serializer_class = PasswordChangeSerializer
    def get_object(self):
        return self.request.user
And finally, we register these 2 views in our urls:
touch users/urls.py
### users/urls.py
from django.urls import path
from .views import SignUp, PasswordChange


urlpatterns = [
    path('signup/', SignUp.as_view()),
    path('password/', PasswordChange.as_view()),
]
### _project/urls.py
from django.contrib import admin
from django.urls import path, include

urlpatterns = [
    path('admin/', admin.site.urls),
    path('o/', include('oauth2_provider.urls', namespace='oauth2_provider')),
    path('users/', include('users.urls'))
]
We can now try to signup a new user using the following http request:
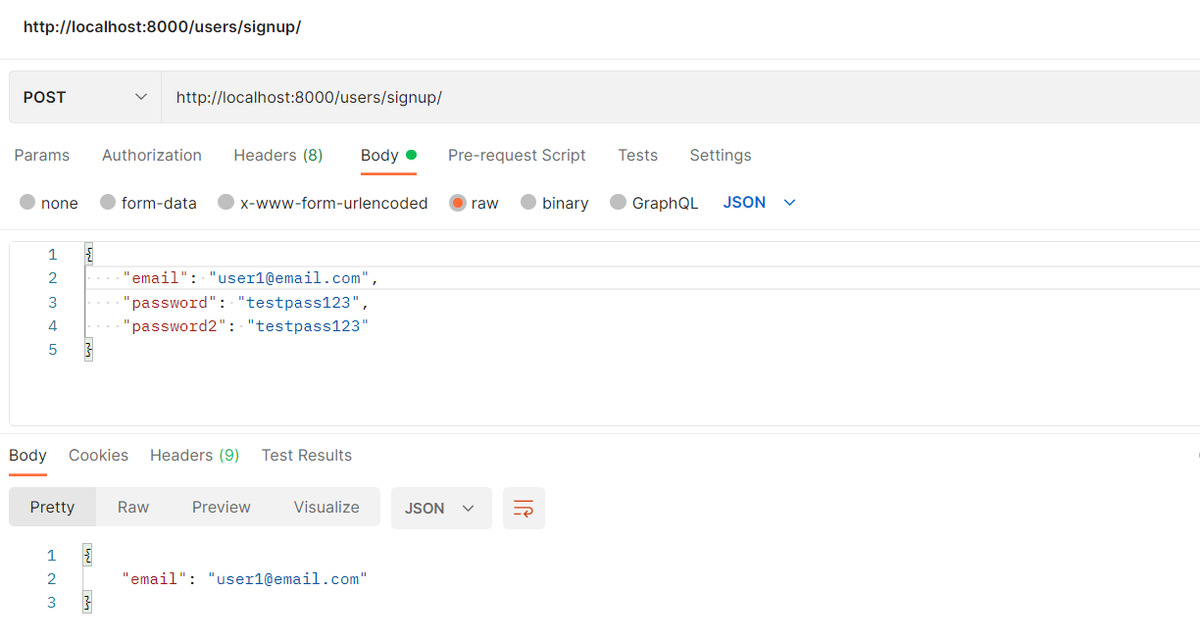
We also now get a token with that new user:

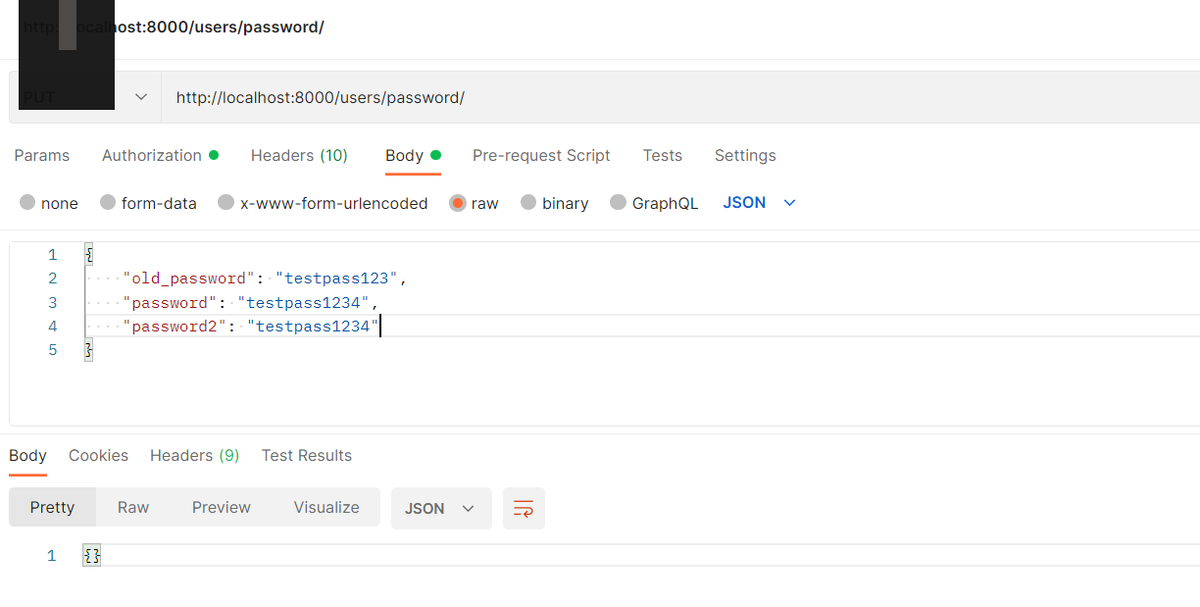
Finally, we can change the password of this new user. Here, we need to attached the access token in a authorization header (type Bearer):
Conclusion
We now have our Oauth server setup!
In the part 2 of this tutorial we will see how to setup a separate resource server that use this Oauth2 API for authentication
You can find the source code of this article on my github
If you have any question or just want to chat, feel free to email me florian.bigot321@gmail.com